
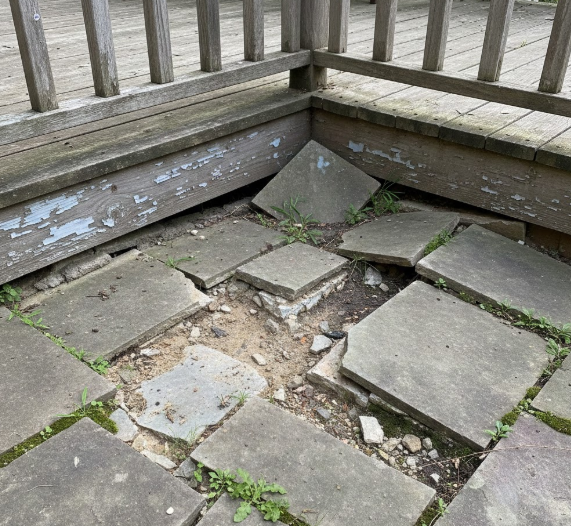
You are not the only one to have the sand and mortar pouring out of your stones. Stone patios, walkways, retaining walls, and outdoor fireplaces often have crumbling mortar. You can begin small, but when you overlook it, it may turn out to be a serious issue.
But listen!
Don’t worry, as the broken mortar can be repaired. It is possible to keep your stone features in good and solid condition long enough with the right steps.
How to Fix Crumbling Mortar
The stones should be made to stick together using mortar, which is intended to prevent moisture. It would deteriorate with time due to weather and wear. It can crack and break under freeze-thaw, heavy rain and under heat.
Poor installation is also problematic. The initial mix can be too weak, too strong, or applied to the wrong part, and it will break more quickly. Any moisture that enters the joints but fails to drain away corrodes the mortar slowly on the inside.
Being aware of the reason will allow you to choose the appropriate fix and prevent future harm.
Step 1: Wipe away the Broken Mortar.
First, remove the loose or falling mortar. This is referred to as raking out the joints. Scrape the spoilt area off using a cold chisel, hammer or joint raker. Be soft, lest you dent or flake the stones.
Take away sufficient mortar to obtain a clean and firm surface to the new mixture. Approximately half an inch is sufficient.
Step 2: Wash the Joints
Clean the joints after washing out the old mortar. New mortar can be prevented from getting dirty. Paint with a hard brush, and wipe with water. Allow it to dry a bit, though keep it moist when applying fresh mortar. The fresh mortar is also stuck to a slightly wet surface, which prevents it from drying very rapidly.
Step 3: Mix the Right Mortar
It is important to select the appropriate mortar. Type N or Type S mix would suffice with most stone fixtures. Attempt to duplicate the capability of the old mortar and color. Test a small patch first in case you are not sure.
Combine the mortar until it becomes thick and workable- a peanut butter consistency would be ideal. It has to be sturdy enough that it does not sag in the joints.
Step 4: Apply the New Mortar
Fill the joints with a pointing trowel or mortar bag. Also, rub the mortar firmly to remove air bubbles. It should be worked in little sections so you can have control over it and create an even application.
Once the joints have been filled, use a jointing tool to make the surface look like the old one. This also assists in drying up water and in shielding mortar.
Step 5: Cure and Protect the Mortar.
Once you have laid the mortar, you have to cure it. This is because it is always best to keep the repaired part damp for the next few days, particularly during hot or windy weather. This makes the mortar dry gradually and prevents the formation of cracks.
When the mortar has dried, you may apply a breathable stone sealer. The sealer prevents the entry of water, but at the same time enables the breathing of the stone and mortar. It provides greater protection and increases the duration of the repair.
When to Call a Professional
Crashes or simple damages can be repaired with minimum efforts. But when the mortar is beginning to decay badly, or the stones are shifting, it could signal greater damage. Then, in such a situation, it is recommended to hire a professional to do the repointing or restoration.
The professionals inspect the structure, use appropriate materials, and ensure that the repair is robust.
Revive your stone features with Decks N Stones. We renovate your outdoor stone surfaces using our ability and equipment, and maintain them to look beautiful.