
Unstable pavers produce a rocking and rolling effect when you walk over them. This is normally an indication of installation problems, bad maint-enance or the natural environment. The appropriate installation of a surface must feel solid, though loose pavers may be stumbling blocks and an uneven stroll.
Nothing could be as good as a newly laid stone patio or a curvy paver walk. It brings style, worth and sophistication to any backyard. In time, however, a surface that was formerly perfectly smooth may start to ride like a roller. A single movement on a corner may tip the stone, and a second may cause it to sink.
The unstable pavers are not only unsightly but also a hazard for tripping and an indicator that the integrity of the structure of your hardscape is compromised. We are sure that at Decks N Stones, you will discover that knowing why is a step to ensuring that the problem is fixed forever.
What Causes Pavers to become Unstable?
Diagnose the underlying cause before you take a shovel. Pavers do not move independently; they respond to the environment.
Inadequate First Base Compaction
The most frequent culprit is a weak foundation. Unless the ground or gravel base was properly compacted during the installation, the stones and people’s weight will lead to the uneven settling of the ground.
Water Drainage Issues
A hardscape is destabilized by water. The water that does not drain but collects in pools enters the joints and moisturizes the bedding sand. The freeze-thaw cycle enlarges the water in cold climates, pushing the stones upwards.
Edge Restraint Failure
Edge restraints serve as bookends of the patio. Pavers move outwards when plastic, metal, or concrete edging is broken or when it is moved. Soon after the interlock is lost, the stones become unstable.
Erosion of Joint Sand
The paver stones are held by friction by the sand, which attracts them. The sand can be washed away by heavy rain or vigorous pressure washing, and this removes the lateral support.
How to Clean Your Pavers: A Complete Guide.
When your patio looks like the bottom of a rocky boat, go through these steps of making the rocky boat a regular one, using this process, which is professional.
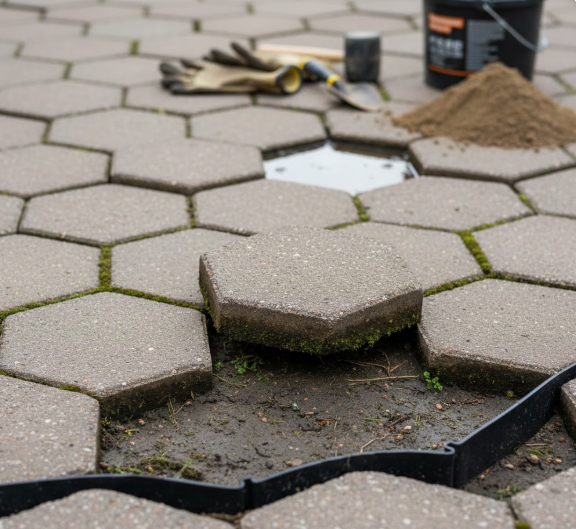
Step 1: Remove and Inspect
Use a flat-head screwdriver or a paver puller to tap up the unsteady pavers with caution. Do not chip away the stones surrounding. Check the bottom of every paver and the exposed base for debris or sinkholes.
Step 2: Level the Base
You cannot just change the paver and hope that all is well. First, deal with the bedding layer.
– Add Crushed Stone: In case of a dip, add a small amount of crushed gravel and press it down.
– The Sand Layer: Add approximate 1 inch of coarse bedding sand (not play sand). Screed the sand using a straight-edge board to have the sand slightly above the base, allowing the sand to settle.
Step 3: Reinstall the Pavers
Put the paver directly in the new sand bed. Do not slide it, as this will cause sand to move around and give a rough surface. Tap the paver with a rubber mallet to make it sit flat with the neighbors.
Step 4: Apply Polymeric Sand
That is the key to long life. Once the pavers are laid, evenly spread polymeric sand into the hollows. Polymeric sand is hardened by misting with water, forming a rubbery glue that will not allow weeds to grow or to be swept away.
Step 5: Compact and Set
In the case of one stone, a mallet suffices. To cover a bigger area, a plate compactor with a pad on it can be used. Spray the place a bit with water to get the polymers on the sand going. Do not overwet in water, since excess can dissolve the binder.
When to Call The Professionals
If your stones are a little loose, a simple DIY fix might work. But if your patio is sinking in big areas or retaining walls are falling, that usually means there’s a bigger problem under the surface, and you need a professional.
At Decks N Stones, we don’t just fix the top layer. We build every part of your patio to last, from the deep soil underneath to the top layer of sand.
Does your patio look old or weak?
Call Decks N Stones today for a professional check, and we’ll help get your outdoor space stable and strong again.